Friday, February 27, 2015
Gusset Construction Continued
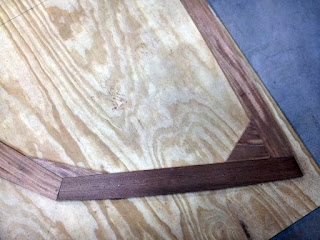
This post will cover the frame gusset and floor timber construction. As mentioned in previous posts, the gussets serve to strengthen the joints of the frame parts. They extend 6" (or more) over each frame piece. They will eventually be nailed and glued to the frame assembly.
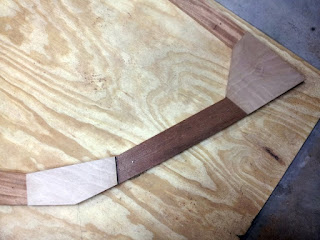
There are two gussets per joint, one on each side of the frame. In addition, there is a filler block between the gussets to fill in the space outside of the frame parts that the gussets lie over. These filler blocks serve two purposes. First, they add additional strength to the joint. Secondly, they fill in an area that would be difficult to encapsulate with epoxy resin later.
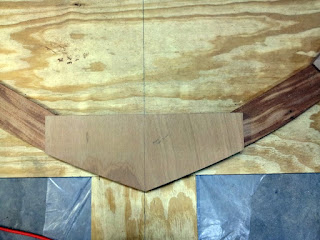
There is also a floor timber. This seres two purposes in the construction. Initially, when the frames are mounted to the building form, they will be resting on the form at these floor timbers. That makes the location and size of thes parts important. They must be the correct location and size in order for the frame to be in the correct position on the building form. The second purpose comes much later in construction when they serve as fllor location points. There will also be a filler block for the floor timber, but I havent gotten to that yet.
The gussets are made from 3/8" marine grade plywood and the floor timber is from 3/4" marine grade plywood. I was initially a bit confused on the floor timber because the building materials called out for 3/4" plywood while in the plan it stated the part was 1" (it didnt state plywood on the plans). After studying the plans and the other materials, I determined that the original part had been intended to be made from 1" mahogany which is the same as the frames, meaning that it was actually 3/4" thick after milling. Later, 3/4" plywood was substituted, most likely because of superior strength in this area of the frame.
The gussets where made by lying thick paper over the joints and creating a template to the size and shape needed. This template was then transferred to the plywood and parts cut out and sanded to final shape. Because the floor timber height is critical, I used paper templates for the botom curves only and measured the remaining sides directly on the plywood.Using the old adage of measure twice and cut once, I made sure everything was the correct size and cut out the floor timber and then sanded it to final shape.
The filler blocks were made from leftover mahogany from the frame construction. I initially cut the two sides that fit against the frames and sanded them straight. Then I used the gussets laid over them to get the final lines. These were also cut out and final sanded.
Here are three pictures showing the various parts mentioned in this post.


All of these parts will be glued together and the gussets and floor timbers will also be attached to the frame parts with ring nails. Ring nails (also sometimes called boat nails) are nails that have small ridges running around the shank of the nail that help to prevent the nail working out later on. These nails will be made from bronze which is he recommended material for fasteners in boat construction (to avoid corrosion issues later in the life of the boat).
Remaining tasks for this frame are cut some notches to accept the keel , chine block, and sheer. They will be finish sanded, and assembled. There are other steps in the assembly process but Ill cover those in another post. There are still six frames to do these same tasks for, so I will be busy doing that for some time. Until, next time.
There are two gussets per joint, one on each side of the frame. In addition, there is a filler block between the gussets to fill in the space outside of the frame parts that the gussets lie over. These filler blocks serve two purposes. First, they add additional strength to the joint. Secondly, they fill in an area that would be difficult to encapsulate with epoxy resin later.
There is also a floor timber. This seres two purposes in the construction. Initially, when the frames are mounted to the building form, they will be resting on the form at these floor timbers. That makes the location and size of thes parts important. They must be the correct location and size in order for the frame to be in the correct position on the building form. The second purpose comes much later in construction when they serve as fllor location points. There will also be a filler block for the floor timber, but I havent gotten to that yet.
The gussets are made from 3/8" marine grade plywood and the floor timber is from 3/4" marine grade plywood. I was initially a bit confused on the floor timber because the building materials called out for 3/4" plywood while in the plan it stated the part was 1" (it didnt state plywood on the plans). After studying the plans and the other materials, I determined that the original part had been intended to be made from 1" mahogany which is the same as the frames, meaning that it was actually 3/4" thick after milling. Later, 3/4" plywood was substituted, most likely because of superior strength in this area of the frame.
The gussets where made by lying thick paper over the joints and creating a template to the size and shape needed. This template was then transferred to the plywood and parts cut out and sanded to final shape. Because the floor timber height is critical, I used paper templates for the botom curves only and measured the remaining sides directly on the plywood.Using the old adage of measure twice and cut once, I made sure everything was the correct size and cut out the floor timber and then sanded it to final shape.
The filler blocks were made from leftover mahogany from the frame construction. I initially cut the two sides that fit against the frames and sanded them straight. Then I used the gussets laid over them to get the final lines. These were also cut out and final sanded.
Here are three pictures showing the various parts mentioned in this post.


All of these parts will be glued together and the gussets and floor timbers will also be attached to the frame parts with ring nails. Ring nails (also sometimes called boat nails) are nails that have small ridges running around the shank of the nail that help to prevent the nail working out later on. These nails will be made from bronze which is he recommended material for fasteners in boat construction (to avoid corrosion issues later in the life of the boat).
Remaining tasks for this frame are cut some notches to accept the keel , chine block, and sheer. They will be finish sanded, and assembled. There are other steps in the assembly process but Ill cover those in another post. There are still six frames to do these same tasks for, so I will be busy doing that for some time. Until, next time.
Subscribe to:
Post Comments (Atom)
No comments:
Post a Comment